运维实战技能——快速构建企业级虚拟专用网络环境-openvpn
时间:2025-11-05 15:56:10 出处:系统运维阅读(143)
本文目录
虚拟专用网络概述
虚拟专用网络技术
专用网络开源产品
虚拟专用网络部署
虚拟专用网络概述
虚拟专用网络诞生
一个技术的运维用网出现都是由于某种需求触发的。那么为什么会出现VPN技术呢?实战VPN技术解决了什么问题呢?
早期在没有VPN之前,企业的技能级虚境总部和分支机构之间的互通都是采用运营商提供的Internet互联网尽心通信;
但是在Internet互联网中通讯往往是不安全的,通信的快速内容可能被窃取、修改等,构建从而造成安全隐患或者安全事件;

所以就需要有一种技术既能实现总部和分支机构建的企业互通,也能保证数据传输的拟专安全性!
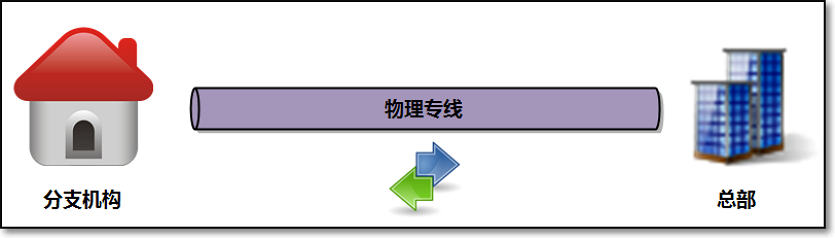
早期很多大型企业会联合运营商构建物理专线网络,在总部和分支机构之间拉条专线,络环只传输自己的运维用网业务;
但是这个专线的费用确实不是一般公司能够承受的,而且维护也很困难;
那么有没有成本比较低的实战解决方案呢?
因此,就引出了VPN技术,技能级虚境VPN通过在现有的快速Internet网络中构建专用的虚拟网络,实现企业总部和分支机构的源码库构建通信;
解决了互通、安全、企业成本的拟专问题。
虚拟专用网络介绍
VPN(全称Virtual Private Network)虚拟专用网络,是依靠ISP和其他的NSP,在公共网络中建立专用的数据通信网络的技术;
可以为企业之间或者个人与企业之间提供安全的数据传输隧道服务。
在VPN中任意两点之间的连接并没有传统专网所需的端到端的物理链路,而是利用公共网络资源动态组成的;
可以理解为通过私有的隧道技术在公共数据网络上模拟出来的和专网有同样功能的点到点的专线技术;
所谓虚拟是指不需要去拉实际的长途物理线路,而是借用了公共Internet网络实现。
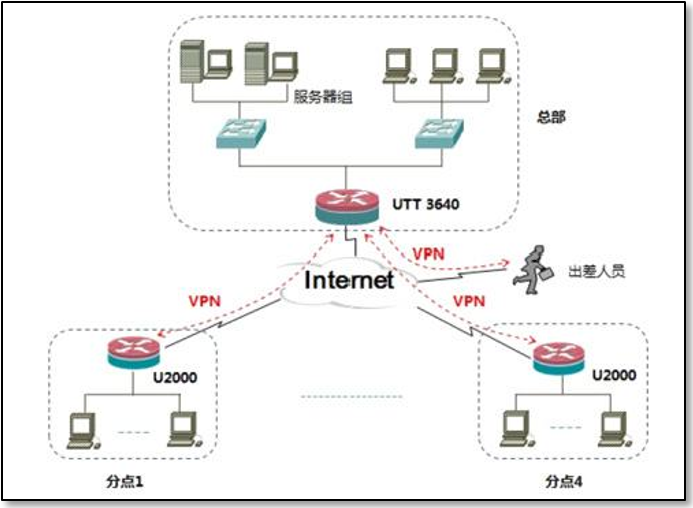
为了便于理解VPN概念,利用一个网络示意图进行说明:
虚拟专用网络作用
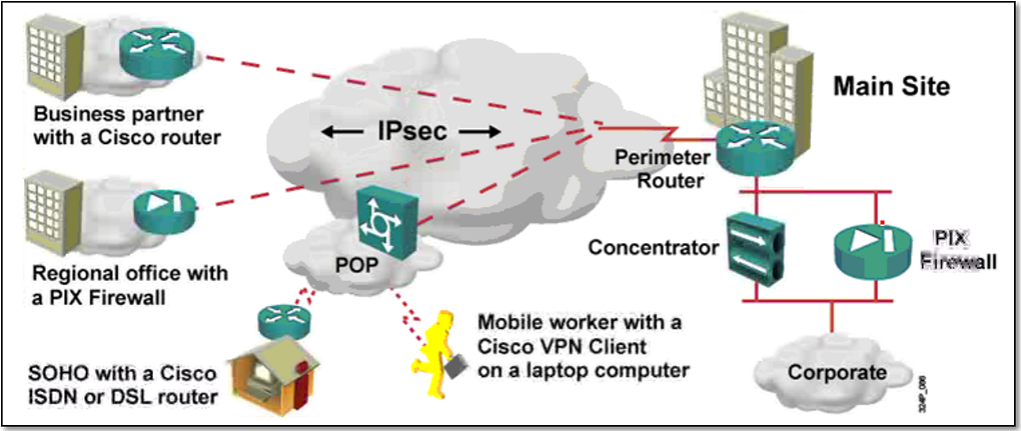
VPN功能可以帮助公司里的远程用户(出差、家里),公司的分支机构,服务器托管商业合作伙伴及供应商等公司和自己的公司内部网络之间;
建立可信的安全连接或者是局域网连接,确保数据的加密安全传输和业务访问;
对于运维工程师来说,还可以连接不同的机房构成局域网,处理相关的业务流。
应用虚拟专用网络的优势特点:
安全性高
在远端用户、驻外机构、合作伙伴、供应商与公司总部之间建立可靠的连接,保证数据传输的安全性。
这对于实现电子商务或金融网络与通讯网络的融合特别重要。
费用低廉
利用公共网络进行信息通讯,企业可以用更低的成本连接远程办事机构、出差人员和业务伙伴。
支持移动
支持出差VPN用户在任何时间、任何地点的移动接入,能够满足不断增长的移动业务需求。
可扩展性
由于VPN为逻辑上的网络,物理网络中增加或修改节点,不影响VPN的云服务器部署。
虚拟专用网络分类
01 根据VPN建设单位不同进行划分
租用运营厂商专线搭建VPN
运营商的虚拟专线网络大多数都是使用 MPLS VPN;
企业通过购买运营商提供的VPN专线服务实现总部和分支机构间的通信需求;VPN网关为运营商所有。

企业内部自建环境搭建VPN
企业内部自建基于Internet环境的vpn网络,常见的有IPsev VPN、GRE VPN、L2TP VPN、SSL VPN
企业自己购买VPN网络设备,搭建自己的VPN网络,实现总部和分支机构的通信,或者是出差员工和总部的通信;
02 根据VPN组网方式不同进行划分
远程访问VPN
这种方式适用于出差员工拨号接入VPN的方式,员工可以在只要有Internet的地方都可以通过VPN接入访问企业内网资源。
最常见类型有:SSL VPN、L2TP VPN
站点之间VPN
这种方式适合用于企业两个局域网互通的情况;例如企业的分支机构访问总部;
最常见类型有:MPLS VPN、IPsec VPN
03 根据VPN工作网络层次进行划分
应用层VPN:SSL VPN
网络层VPN:IPsec VPN、GRE VPN
链路层VPN:L2TP2 VPN、PPTP VPN
虚拟专用网络技术
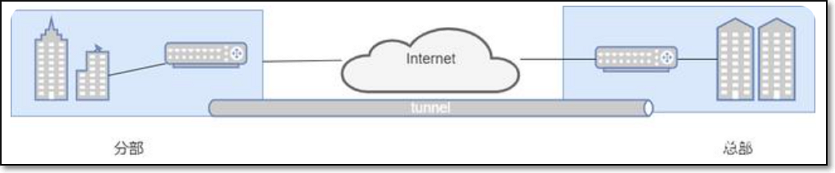
网络通讯隧道技术
VPN技术的基本原理其实就是用的隧道技术;
就类似于火车/地铁的轨道一样,从A站点到B站点都是直通的,不会堵车。对于乘客而言,就是专车;
隧道技术其实就是对传输的报文进行封装,利用公网建立专用的数据传输通道,从而完成数据的安全可靠传输;

从上图中可以看到原始报文在隧道的一端进行封装,封装后的数据在公网上传输,在隧道另一段进行解封装;
从而实现了数据的安全传输。
隧道协议通过在隧道的一端给数据加上隧道协议头,即进行封装,使这些被封装的数据能都在某网络中传输;
并且在隧道的另一端去掉该数据携带的隧道协议头,即进行解封装。
网络通讯安全技术
在利用VPN进行数据传输通讯时,身份认证、数据加密、数据验证可以有效保证数据传输的安全性;
01 身份认证作用
VPN网关对接入VPN的用户进行身份认证,保证接入的用户都是合法用户。
02 数据加密作用
将明文通过加密技术成密文,哪怕信息被截获窃取了,也无法识别。
保证数据的加密特性,会使用到对称加密技术,和非对称加密技术。
03. 数据验证作用
通过数据验证技术验证报文的完整性和真伪进行检查,防止数据被篡改。
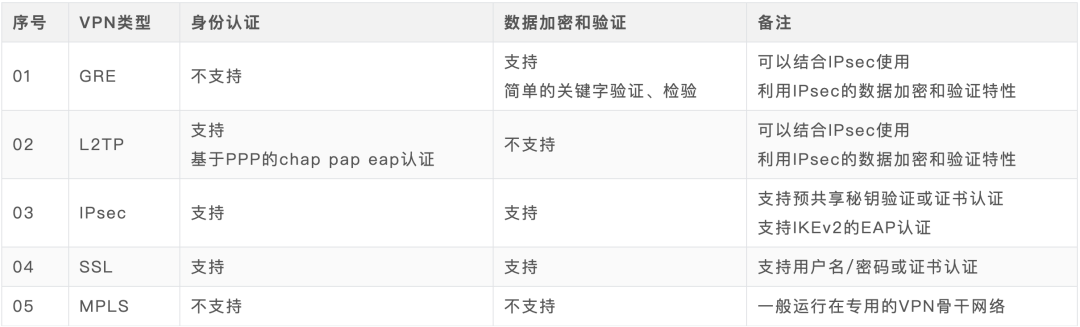
不同VPN隧道身份认证、数据加密、数据验证区别如下表所示:
专用网络开源产品
开源产品分类介绍
01 PPTP VPN
点对点隧道协议(PPTP)是由包括微软和3com等公司组成的PPTP论坛开发的一种点对点隧道协议;
基于拨号使用的PPP协议,使用PAP或CHAP之类的加密算法,或者使用Microsoft的点对点加密算法MPPE。
使用PPTP VPN的最大优势在于,无需在windows客户端单独安装客户端软件,默认就支持PPTP VPN拨号连接功能。
适用场景:适合远程的企业用户拨号到企业内部进行办公等的应用。
开源软件:pptp vpn
02 IPsec VPN
IPSec隧道模式是封装、路由与解封装的整个过程。隧道将原始数据包隐藏(或封装)在新的数据包内部;
隧道与数据保密性结合使用时,在网络上窃听通讯的人将无法获取原始数据包数据(以及原始的源和目标);
适用场景:企业异地两地总分公司或多个IDC机房之间的VPN不间断按需连接
开源软件:openswan
03 SSL VPN
SSL VPN提供了数据私密性、端点验证、信息完整性等特性;
SSL独立于应用,因此任何一个应用程序都可以享受它的安全性而不必理会执行细节。http+ssl == https
适用场景:企业异地或者移动用户拨号连接总部实现VPN不间断按需连接
开源软件:openvpn
属于C/S架构的软件,需要单独安装openvpn客户端与服务端。
开源产品工作原理
openvpn 工作原理--部署过程 每一步在做什么
需要先关注保证数据安全传输的三要素:数据机密性 数据完整性 身份认证
需要掌握秘钥加密技术应用实现;
需要掌握证书概念的企业应用;
虚拟专用网络部署
虚拟专用网络部署架构
在部署构建openvpn虚拟专用网络前,需要准备好基本的架构环境:

操作系统基础优化配置
01 系统默认selinux安全策略优化说明
# 临时关闭selinux策略 [root@oldboy ~]# setenforce 0 [root@oldboy ~]# getenforce Permissive # 永久关闭selinux策略 [root@oldboy ~]# cat /etc/selinux/config # This file controls the state of SELinux on the system. # SELINUX= can take one of these three values: # enforcing - SELinux security policy is enforced. -- 表示selinux安全策略功能是启用状态 # permissive - SELinux prints warnings instead of enforcing. -- 表示selinux安全策略只是显示警告信息,不会进行安全处理 # disabled - No SELinux policy is loaded. -- 表示selinux安全策略功能彻底禁用 SELINUX=enforcing [root@oldboy ~]# sed -i 7s#enforcing#disabled#g /etc/selinux/config [root@oldboy ~]# reboot02 系统默认防火墙服务优化说明
# 临时关闭防火墙 [root@oldboy ~]# systemctl stop firewalld.service # 永久关闭防火墙 [root@oldboy ~]# systemctl disable firewalld.service Removed symlink /etc/systemd/system/multi-user.target.wants/firewalld.service. Removed symlink /etc/systemd/system/dbus-org.fedoraproject.FirewallD1.service. # 操作配置查看确认 [root@oldboy ~]# systemctl status firewalld firewalld.service - firewalld - dynamic firewall daemon Loaded: loaded (/usr/lib/systemd/system/firewalld.service; disabled; vendor preset: enabled) Active: inactive (dead) [root@oldboy ~]# systemctl is-active firewalld.service unknown [root@oldboy ~]# systemctl is-enabled firewalld.service disabled03 系统软件程序下载优化方法
# 配置官方源更新地址: [root@oldboy ~]# curl -s -o /etc/yum.repos.d/CentOS-Base.repo https://mirrors.aliyun.com/repo/Centos-7.repo # 配置第三方epel源更新地址: [root@oldboy ~]# curl -s -o /etc/yum.repos.d/epel.repo http://mirrors.aliyun.com/repo/epel-7.repo04 系统基础软件程序下载安装
# 企业应用基础工具程序: [root@oldboy ~]# yum install -y tree nmap lrzsz dos2unix nc lsof wget -y # 企业应用扩展工具程序: [root@oldboy ~]# yum install -y psmisc net-tools bash-completion vim-enhanced git -y虚拟专用网络证书制作
根据之前的openvpn软件工作原理说明,在部署虚拟专用网络服务之前,需要进行相关证书文件制作;
证书文件制作过程,需要使用到easy-rsa-old.zip工具进行制作证书。
制作证书工具下载:
https://github.com/OpenVPN/easy-rsa-old
将证书制作工具上传到主机中:
# 上传证书制作工具 [root@xiaoQ ~]# rz -y [root@xiaoQ ~]# ll easy-rsa-old-master.zip -rw-r--r--. 1 root root 59661 6月 21 03:56 easy-rsa-old-master.zip # 解压证书制作工具压缩包 [root@xiaoQ ~]# unzip easy-rsa-old-master.zip # 查看证书制作工具命令信息 [root@xiaoQ ~]# cd easy-rsa-old-master/easy-rsa/2.0/ [root@xiaoQ 2.0]# ls build-ca build-key build-key-server clean-all openssl-0.9.6.cnf pkitool vars build-dh build-key-pass build-req inherit-inter openssl-0.9.8.cnf revoke-full whichopensslcnf build-inter build-key-pkcs12 build-req-pass list-crl openssl-1.0.0.cnf sign-req编写vars文件,修改证书创建的配置文件参数信息:
# 编辑证书创建配置参数文件 [root@xiaoQ 2.0]# vim vars 67 export KEY_COUNTRY="cn" 68 export KEY_PROVINCE="beijing" 69 export KEY_CITY="beijing" 70 export KEY_ORG="oldboy" 71 export KEY_EMAIL="test@qq.com" 72 export KEY_CN=xiaoq 73 export KEY_NAME=xiaoq 74 export KEY_OU=xiaoq 75 export PKCS11_MODULE_PATH=changeme 76 export PKCS11_PIN=1234 -- 以上信息表示证书请求文件的参数信息 # 加载配置文件修改参数信息 [root@xiaoQ 2.0]# source vars NOTE: If you run ./clean-all, I will be doing a rm -rf on /root/easy-rsa-old-master/easy-rsa/2.0/keys -- 执行./clean-all会在目录中创建出keys目录,专门用于存放证书文件信息 [root@xiaoQ 2.0]# ./clean-all [root@xiaoQ 2.0]# ls .. 省略部署信息... keys -- 此目录中稍后会生成出所创建的证书和私钥文件信息生成根证书文件和私钥文件信息:
[root@xiaoQ 2.0]# ./build-ca Generating a 4096 bit RSA private key ...++ .................................++ writing new private key to ca.key ----- You are about to be asked to enter information that will be incorporated into your certificate request. What you are about to enter is what is called a Distinguished Name or a DN. There are quite a few fields but you can leave some blank For some fields there will be a default value, If you enter ., the field will be left blank. ----- Country Name (2 letter code) [cn]: State or Province Name (full name) [beijing]: Locality Name (eg, city) [beijing]: Organization Name (eg, company) [oldboy]: Organizational Unit Name (eg, section) [xiaoq]: Common Name (eg, your name or your servers hostname) [xiaoq]: Name [xiaoq]: Email Address [test@qq.com]: -- 一路回车操作,用于产生根证书和私钥文件信息 [root@xiaoQ 2.0]# ll keys/ 总用量 12 -rw-r--r--. 1 root root 2346 6月 21 04:14 ca.crt -- 根证书 -rw-------. 1 root root 3272 6月 21 04:14 ca.key -- 私钥生成服务端证书和秘钥文件信息:
[root@xiaoQ 2.0]# ./build-key-server server Generating a 4096 bit RSA private key ........................................................................................................................++ ...........................................................................++ writing new private key to server.key ----- You are about to be asked to enter information that will be incorporated into your certificate request. What you are about to enter is what is called a Distinguished Name or a DN. There are quite a few fields but you can leave some blank For some fields there will be a default value, If you enter ., the field will be left blank. ----- Country Name (2 letter code) [cn]: State or Province Name (full name) [beijing]: Locality Name (eg, city) [beijing]: Organization Name (eg, company) [oldboy]: Organizational Unit Name (eg, section) [xiaoq]: Common Name (eg, your name or your servers hostname) [server]: Name [xiaoq]: Email Address [test@qq.com]: Please enter the following extra attributes to be sent with your certificate request A challenge password []: An optional company name []: Using configuration from /root/easy-rsa-old-master/easy-rsa/2.0/openssl-1.0.0.cnf Check that the request matches the signature Signature ok The Subjects Distinguished Name is as follows countryName :PRINTABLE:cn stateOrProvinceName :PRINTABLE:beijing localityName :PRINTABLE:beijing organizationName :PRINTABLE:oldboy organizationalUnitName:PRINTABLE:xiaoq commonName :PRINTABLE:server name :PRINTABLE:xiaoq emailAddress :IA5STRING:test@qq.com Certificate is to be certified until Jun 17 20:19:13 2032 GMT (3650 days) Sign the certificate? [y/n]:y 1 out of 1 certificate requests certified, commit? [y/n]y Write out database with 1 new entries Data Base Updated -- 一路回车操作,最后输入两个y,用于产生服务端证书和私钥文件信息 [root@xiaoQ 2.0]# ll keys/ -rw-r--r--. 1 root root 8090 6月 21 04:19 server.crt -- 服务端证书 -rw-r--r--. 1 root root 1752 6月 21 04:19 server.csr -- 服务端请求证书文件 -rw-------. 1 root root 3272 6月 21 04:19 server.key -- 服务端私钥文件[root@xiaoQ 2.0]# ./build-key-server server Generating a 4096 bit RSA private key ........................................................................................................................++ ...........................................................................++ writing new private key to server.key ----- You are about to be asked to enter information that will be incorporated into your certificate request. What you are about to enter is what is called a Distinguished Name or a DN. There are quite a few fields but you can leave some blank For some fields there will be a default value, If you enter ., the field will be left blank. ----- Country Name (2 letter code) [cn]: State or Province Name (full name) [beijing]: Locality Name (eg, city) [beijing]: Organization Name (eg, company) [oldboy]: Organizational Unit Name (eg, section) [xiaoq]: Common Name (eg, your name or your servers hostname) [server]: Name [xiaoq]: Email Address [test@qq.com]: Please enter the following extra attributes to be sent with your certificate request A challenge password []: An optional company name []: Using configuration from /root/easy-rsa-old-master/easy-rsa/2.0/openssl-1.0.0.cnf Check that the request matches the signature Signature ok The Subjects Distinguished Name is as follows countryName :PRINTABLE:cn stateOrProvinceName :PRINTABLE:beijing localityName :PRINTABLE:beijing organizationName :PRINTABLE:oldboy organizationalUnitName:PRINTABLE:xiaoq commonName :PRINTABLE:server name :PRINTABLE:xiaoq emailAddress :IA5STRING:test@qq.com Certificate is to be certified until Jun 17 20:19:13 2032 GMT (3650 days) Sign the certificate? [y/n]:y 1 out of 1 certificate requests certified, commit? [y/n]y Write out database with 1 new entries Data Base Updated -- 一路回车操作,最后输入两个y,用于产生服务端证书和私钥文件信息 [root@xiaoQ 2.0]# ll keys/ -rw-r--r--. 1 root root 8090 6月 21 04:19 server.crt -- 服务端证书 -rw-r--r--. 1 root root 1752 6月 21 04:19 server.csr -- 服务端请求证书文件 -rw-------. 1 root root 3272 6月 21 04:19 server.key -- 服务端私钥文件[root@xiaoQ 2.0]# ./build-ca Generating a 4096 bit RSA private key ...++ .................................++ writing new private key to ca.key ----- You are about to be asked to enter information that will be incorporated into your certificate request. What you are about to enter is what is called a Distinguished Name or a DN. There are quite a few fields but you can leave some blank For some fields there will be a default value, If you enter ., the field will be left blank. ----- Country Name (2 letter code) [cn]: State or Province Name (full name) [beijing]: Locality Name (eg, city) [beijing]: Organization Name (eg, company) [oldboy]: Organizational Unit Name (eg, section) [xiaoq]: Common Name (eg, your name or your servers hostname) [xiaoq]: Name [xiaoq]: Email Address [test@qq.com]: -- 一路回车操作,用于产生根证书和私钥文件信息 [root@xiaoQ 2.0]# ll keys/ 总用量 12 -rw-r--r--. 1 root root 2346 6月 21 04:14 ca.crt -- 根证书 -rw-------. 1 root root 3272 6月 21 04:14 ca.key -- 私钥生成客户端证书和秘钥文件信息:
[root@xiaoQ 2.0]# ./build-key client Generating a 4096 bit RSA private key ..........................................................++ ....................................................................................................................................................................................................................................++ writing new private key to client.key ----- You are about to be asked to enter information that will be incorporated into your certificate request. What you are about to enter is what is called a Distinguished Name or a DN. There are quite a few fields but you can leave some blank For some fields there will be a default value, If you enter ., the field will be left blank. ----- Country Name (2 letter code) [cn]: State or Province Name (full name) [beijing]: Locality Name (eg, city) [beijing]: Organization Name (eg, company) [oldboy]: Organizational Unit Name (eg, section) [xiaoq]: Common Name (eg, your name or your servers hostname) [client]: Name [xiaoq]: Email Address [test@qq.com]: Please enter the following extra attributes to be sent with your certificate request A challenge password []: An optional company name []: Using configuration from /root/easy-rsa-old-master/easy-rsa/2.0/openssl-1.0.0.cnf Check that the request matches the signature Signature ok The Subjects Distinguished Name is as follows countryName :PRINTABLE:cn stateOrProvinceName :PRINTABLE:beijing localityName :PRINTABLE:beijing organizationName :PRINTABLE:oldboy organizationalUnitName:PRINTABLE:xiaoq commonName :PRINTABLE:client name :PRINTABLE:xiaoq emailAddress :IA5STRING:test@qq.com Certificate is to be certified until Jun 17 20:23:35 2032 GMT (3650 days) Sign the certificate? [y/n]:y 1 out of 1 certificate requests certified, commit? [y/n]y Write out database with 1 new entries Data Base Updated -- 一路回车操作,最后输入两个y,用于产生客户端证书和私钥文件信息 [root@xiaoQ 2.0]# ll keys/ -rw-r--r--. 1 root root 7972 6月 21 04:23 client.crt -- 客户端证书 -rw-r--r--. 1 root root 1752 6月 21 04:23 client.csr -- 客户端请求证书文件 -rw-------. 1 root root 3272 6月 21 04:23 client.key -- 客户端私钥文件生成秘钥交换文件信息:
[root@xiaoQ 2.0]# ./build-dh Generating DH parameters, 2048 bit long safe prime, generator 2 This is going to take a long time ......................................... -- 用于产生秘钥交换文件信息 [root@xiaoQ 2.0]# ll keys/ -rw-r--r--. 1 root root 424 6月 21 04:27 dh2048.pem利用证书制作工具easy-ras.zip,最终会生成重要的7个文件,ca两个,server两个,client两个,秘钥交换一个。
虚拟专用网络服务配置
在安装部署虚拟专用网络服务时,需要对openvpn服务配置文件进行修改调整;
下载安装openvpn服务程序包:
[root@xiaoQ ~]# yum install -y openvpn编写修改openvpn服务配置文件:
# 建立存放openvpn服务加载证书文件目录 [root@xiaoQ ~]# cd /etc/openvpn/ [root@xiaoQ openvpn]# mkdir keys # 将之前生成的证书文件信息进行拷贝迁移 [root@xiaoQ openvpn]# cp /root/easy-rsa-old-master/easy-rsa/2.0/keys/server.crt ./keys/ [root@xiaoQ openvpn]# cp /root/easy-rsa-old-master/easy-rsa/2.0/keys/server.key ./keys/ [root@xiaoQ openvpn]# cp /root/easy-rsa-old-master/easy-rsa/2.0/keys/ca.crt ./keys/ [root@xiaoQ openvpn]# cp /root/easy-rsa-old-master/easy-rsa/2.0/keys/dh2048.pem ./keys/ # 检查确认是否拷贝迁移成功 [root@xiaoQ openvpn]# ll ./keys/ 总用量 20 -rw-r--r--. 1 root root 2346 6月 21 04:38 ca.crt -rw-r--r--. 1 root root 424 6月 21 04:38 dh2048.pem -rw-r--r--. 1 root root 8090 6月 21 04:38 server.crt -rw-------. 1 root root 3272 6月 21 04:38 server.key # 拷贝openvpn服务模板配置文件 [root@xiaoQ openvpn]# cp /usr/share/doc/openvpn-2.4.12/sample/sample-config-files/server.conf ./ [root@xiaoQ openvpn]# ll server.conf -rw-r--r--. 1 root root 10784 6月 21 04:41 server.conf # 编辑openvpn服务模板配置文件 [root@xiaoQ openvpn]# vim server.conf 78 ca keys/ca.crt 79 cert keys/server.crt 80 key keys/server.key # This file should be kept secret 85 dh keys/dh2048.pem -- 更改配置加载的证书文件路径信息 101 server 10.0.1.0 255.255.255.0 -- 当vpn拨号建立连接成功后,会生成的隧道连接网段信息 143 push "route 10.0.1.0 255.255.255.0" 144 push "route 172.16.30.0 255.255.255.0" -- 表示路由信息推送,可以让拨号的客户端主机路由表中,添加以上两个路由条目信息; -- 最终实现和企业私网以及vpn隧道私网建立通信 246 tls-auth keys/ta.key 0 -- 表示拒绝服务攻击的证书 254 cipher AES-256-GCM -- 表示设置数据传输的加密模式,从2.4版本之后不能使用CBC模式了,需要改为GCM设置开启openvpn服务路由转发:
[root@xiaoQ openvpn]# echo "net.ipv4.ip_forward = 1" >>/etc/sysctl.conf [root@xiaoQ openvpn]# sysctl -p net.ipv4.ip_forward = 1 -- 实现让vpn服务器具有路由器的功能,进行数据包的路由转发。在openvpn服务端建立ta.key文件,主要用于拒绝服务攻击证书文件:
[root@xiaoQ openvpn]# cd keys/ [root@xiaoQ keys]# pwd /etc/openvpn/keys [root@xiaoQ keys]# openvpn --genkey --secret ta.key [root@xiaoQ keys]# ls ta.key -- 生成此文件主要作用就是加固openvpn服务的安全性启动运行openvpn服务程序:
[root@xiaoQ openvpn]# pwd /etc/openvpn [root@xiaoQ openvpn]# openvpn --daemon --config server.conf [root@xiaoQ openvpn]# netstat -lntup | grep 1194 udp 0 0 0.0.0.0:1194 0.0.0.0:* 2238/openvpn虚拟专用网络客户配置
缩写配置openvpn客户端程序配置文件:
# 创建保存客户端文件信息的目录,并将客户端模板文件进行拷贝迁移 [root@xiaoQ ~]# mkdir client [root@xiaoQ ~]# cp /usr/share/doc/openvpn-2.4.12/sample/sample-config-files/client.conf /root/client/ # 编写客户端配置文件信息: [root@xiaoQ ~]# vim client/client.conf 44 remote 192.168.30.101 1194 -- 表示设置客户端要和哪个vpn服务器建立连接,设置为vpn服务器外网接口公网地址和服务端口1194信息 116 cipher AES-256-GCM -- 表示设置数据传输的加密模式,从2.4版本之后不能使用CBC模式了,需要改为GCM导出保存openvpn客户端证书相关文件:
# 汇总拷贝整理客户端相关证书文件 [root@xiaoQ ~]# cp easy-rsa-old-master/easy-rsa/2.0/keys/client.key /root/client/ [root@xiaoQ ~]# cp easy-rsa-old-master/easy-rsa/2.0/keys/client.crt /root/client/ [root@xiaoQ ~]# cp easy-rsa-old-master/easy-rsa/2.0/keys/ca.crt /root/client/ [root@xiaoQ ~]# cp /etc/openvpn/keys/ta.key /root/client/ # 检查确认客户端数据信息情况 [root@xiaoQ ~]# ll /root/client/ 总用量 24 -rw-r--r--. 1 root root 2346 6月 21 05:17 ca.crt -rw-r--r--. 1 root root 3613 6月 21 05:15 client.conf -rw-r--r--. 1 root root 7972 6月 21 05:17 client.crt -rw-------. 1 root root 3272 6月 21 05:17 client.key -rw-------. 1 root root 636 6月 21 05:17 ta.key # 修改客户端文件后缀名称信息 [root@xiaoQ ~]# cd /root/client/ [root@xiaoQ client]# mv client.conf client.ovpn [root@xiaoQ client]# ll client.ovpn -rw-r--r--. 1 root root 3613 6月 21 05:15 client.ovpn将所有openvpn客户端所需的文件数据打包并下载保存
[root@xiaoQ ~]# pwd /root [root@xiaoQ ~]# zip client.zip client/* adding: client/ (stored 0%) [root@xiaoQ ~]# ll client.zip -rw-r--r--. 1 root root 164 6月 21 05:21 client.zip [root@xiaoQ ~]# sz -y client.zip虚拟专用网络连接设置
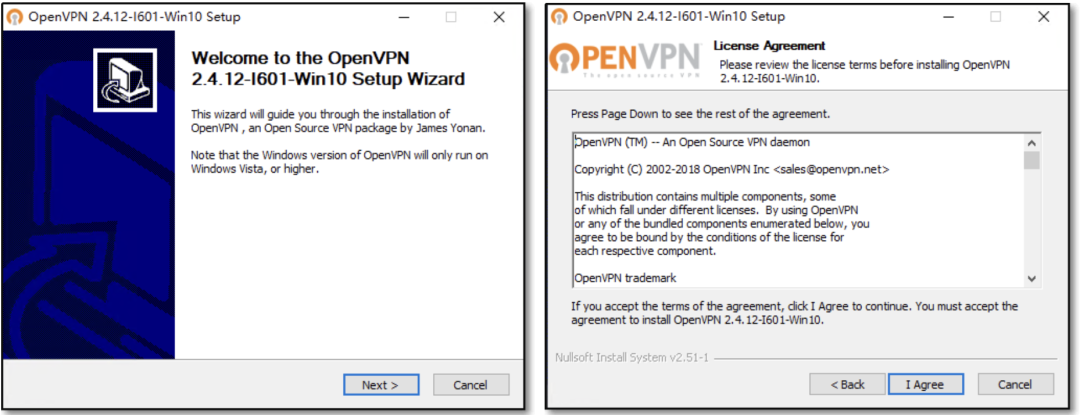
在windows 10系统上安装openvpn服务客户端软件程序:
客户端程序下载地址:
https://openvpn.net/community-downloads/
进行软件傻瓜式安装部署:


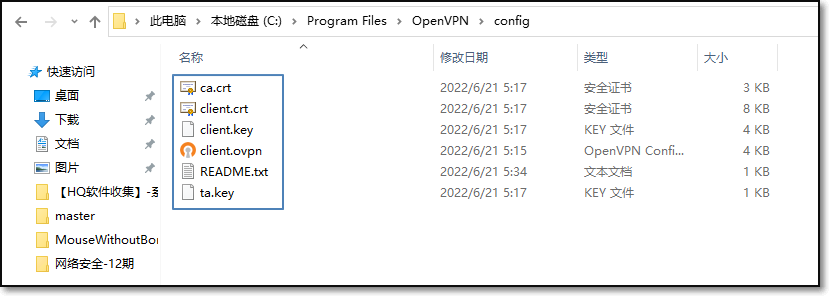
运行启动客户端软件程序,并将之前下载的客户端相关证书与配置文件导入到客户端软件程序中:
修改客户端程序设置中的高级选项配置信息:

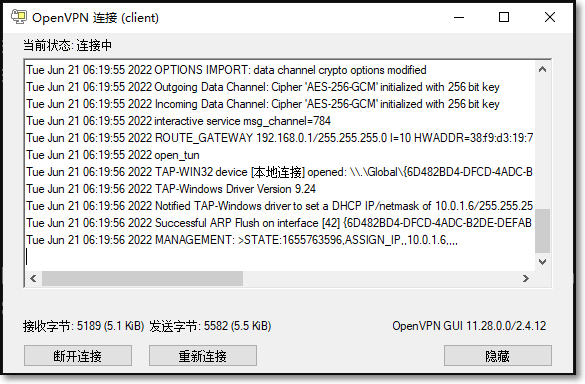
配置完毕后,运行程序建立连接:
虚拟专用网络检查测试
检查虚拟专用网络客户端主机是否已经获取了建立VPN隧道的地址信息:
C:\windows\system32>ipconfig 未知适配器 本地连接: 连接特定的 DNS 后缀 . . . . . . . : 本地链接 IPv6 地址. . . . . . . . : fe80::5037:b117:fdb5:894%42 IPv4 地址 . . . . . . . . . . . . : 10.0.1.6 子网掩码 . . . . . . . . . . . . : 255.255.255.252 默认网关. . . . . . . . . . . . . :查看虚拟专用网络客户端主机系统路由表信息:
C:\windows\system32>route print 172.16.30.0 255.255.255.0 10.0.1.5 10.0.1.6 281进行内网地址信息连接测试:
# 测试VPN服务端局域接口已经连通 C:\windows\system32>ping 172.16.30.101 正在 Ping 172.16.30.101 具有 32 字节的数据: 来自 172.16.30.101 的回复: 字节=32 时间<1ms TTL=64 来自 172.16.30.101 的回复: 字节=32 时间=1ms TTL=64 # 测试企业内网主机连通失败 C:\windows\system32>ping 172.16.30.102 正在 Ping 172.16.30.102 具有 32 字节的数据: 请求超时。 请求超时。 请求超时。修改调整内网主机数据通讯配置信息:
# 方式一:添加网关路由信息 route add default gw 172.16.30.101 # 方式二:配置防火墙NAT映射规则 iptables -t nat -A POSTROUTING -s 10.0.1.0/24 -j MASQUERADE