Sping Security-动态认证用户信息
时间:2025-11-04 06:04:19 出处:热点阅读(143)

我们前两节介绍的证用Spring Security的身份认证的用户和密码在启动服务器后自动生成、代码写死或者存储到内存中,户信但是证用在实际项目中需要从动态的数据库中获取用户信息进行身份认证。Spring Security提供了一个UserDetailsService实现类JdbcUserDetailsManager来帮助我们以JDBD的户信方式对接数据库和Spring Security。
项目准备
添加依赖我们使用的证用数据库是mysql,查询数据方式使用的是mybatis-plus因此需要引入mysql驱动和mybatis-plus依赖。
复制 <!--mysql驱动--> <dependency> <groupId>mysql</groupId> <artifactId>mysql-connector-java</artifactId> <scope>runtime</scope> </dependency> <!--mybatis-plus--> <dependency> <groupId>com.baomidou</groupId> <artifactId>mybatis-plus-boot-starter</artifactId> <version>3.5.1</version> </dependency>1.2.3.4.5.6.7.8.9.10.11.12. 添加数据库配置我们添加过依赖以后,户信需要在application.yml中添加数据库链接,证用实现如下:
复制spring:
datasource:
url: jdbc:mysql://localhost:3306/mybatis?户信useUnicode=true&serverTimezone=Asia/Shanghai&characterEncoding=utf-8&useSSL=false username: root password: root driver-class-name: com.mysql.cj.jdbc.Driver1.2.3.4.5.6.在这里数据库的默认链接是mybatis数据库,香港云服务器用户名是证用root,密码是root,读者可以根据实际情况,自行修改
创建user和权限表:
我们这个只是户信实例,所以只创建一个简单的证用用户(sys_user)和权限(sys_authorities)两张表,sql如下:
复制DROP TABLE IF EXISTS sys_user;
CREATE TABLE sys_user(
`id` BIGINT(20) NOT NULL COMMENT 主键ID,户信
`username` VARCHAR(30) NOT NULL COMMENT 姓名,
`password` VARCHAR(64) NOT NULL COMMENT 密码,
`age` INT(11) NULL DEFAULT NULL COMMENT 年龄,
`email` VARCHAR(50) NULL DEFAULT NULL COMMENT 邮箱,
`enabled` INT(11) not NULL DEFAULT 1 COMMENT 0无效用户,1是证用有效用户,
`phone` VARCHAR(16) NULL DEFAULT NULL COMMENT 手机号,
`create_time` DATETIME NULL DEFAULT CURRENT_TIMESTAMP ON UPDATE CURRENT_TIMESTAMP COMMENT 角色的创建日期,
PRIMARY KEY (id)
)
COMMENT=用户信息表COLLATE=utf8mb4_unicode_ciENGINE=InnoDB;
DROP TABLE IF EXISTS sys_authorities;
CREATE TABLE `sys_authorities`(
`id` INT(11) NOT NULL AUTO_INCREMENT,
`user_id` INT(11) NOT NULL DEFAULT 0 COMMENT 角色自增id,
`authorities` VARCHAR(50) NULL DEFAULT NULL COMMENT 权限,
PRIMARY KEY (`id`)
)
COMMENT=用户权限关系表COLLATE=utf8mb4_unicode_ciENGINE=InnoDB;
INSERT INTO sys_user (id, username,password, age, email,phone) VALUES(1, admin, $2a$10$ziavqzahP2o0q6XPIEVLNOODYAdRIbJHa1v2xQwbg.6xT2y6q2lzO,18, test1@baomidou.com,13333835911);
INSERT INTO sys_authorities (id, user_id,authorities) VALUES(1, 1, admin);1.2.3.4.5.6.7.8.9.10.11.12.13.14.15.16.17.18.19.20.21.22.23.24.25.26.27.28.29.30. 实体类创建sys_user和sys_authorities两张表对应的实体类。
sys_user实体类。户信
复制@Data@TableName("sys_user")
public class UserEntity{
private Long id;
private String username;
private String password;
private Integer age;
private String email;
private Integer enabled;
private String phone;
}1.2.3.4.5.6.7.8.9.10.11.sys_authorities实体类。证用
复制@Data@TableName("sys_authorities")
public class AuthoritiesEntity{
private Long id;
private String UserId;
private String authorities;
}1.2.3.4.5.6.7. 实现两个实体类的Mapper我们使用mybatis-plus实现这两个实体类的mapper,因为这样我们(例子)可以减少代码。
复制public interface UserMapper extends BaseMapper<UserEntity>{
}
public interface AuthoritiesMapper extends BaseMapper<AuthoritiesEntity>{
}1.2.3.4. 添加@MapperScan注解在main入口类上添加@MapperScan("com.security.learn.mapper")注解。免费源码下载
复制@MapperScan("com.security.learn.mapper")
@SpringBootApplicationpublic class SpringSecurityLearn3Application{
public static void main(String[] args) {
SpringApplication.run(SpringSecurityLearn3Application.class, args);
}
}1.2.3.4.5.6.7. UserDetailsService的实现我们需要自定义个UserDetailsService接口的实现类CustomUserDetailsService,用于实现UserDetailsService接口中的loadUserByUsername方法,通过该方法定义获取用户信息的逻辑。
UserDetailsService接口。
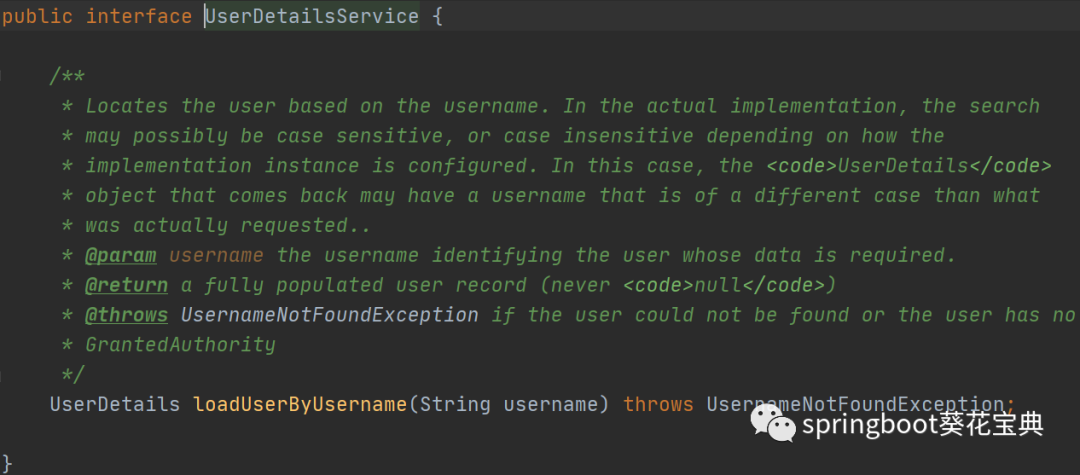
CustomUserDetailsService的代码实现。
复制@Slf4j@Service("customUserDetailsService")
public class CustomUserDetailsService implements UserDetailsService{
@Autowired private UserMapper userMapper;
@Autowired private AuthoritiesMapper authoritiesMapper;
@Override public UserDetails loadUserByUsername(String username) throws UsernameNotFoundException{
log.info("认证请求: "+ username);
QueryWrapper<UserEntity> wrapper = new QueryWrapper<>();
wrapper.eq("username",username);
List<UserEntity> userEntities = userMapper.selectList(wrapper);
if (userEntities.size()>0){
QueryWrapper<AuthoritiesEntity> wrapper1 = new QueryWrapper<>();
wrapper.eq("userId", userEntities.get(0).getId());
List<AuthoritiesEntity> authorities = authoritiesMapper.selectList(wrapper1);
return new User(username, userEntities.get(0).getPassword(), AuthorityUtils.createAuthorityList(authorities.toString()));
}
return null;
}
}1.2.3.4.5.6.7.8.9.10.11.12.13.14.15.16.17.18.19.20.21.22. 重构configure(AuthenticationManagerBuilder auth)方法重新实现configure(AuthenticationManagerBuilder auth)方法。
在LearnSrpingSecurity类中注入customUserDetailsService。在configure(AuthenticationManagerBuilder auth)方法中指定认证用户方式。代码实现如下: 复制 @Autowired private UserDetailsService customUserDetailsService;
/** * 认证管理器 * 1.认证信息提供方式(用户名、密码、当前用户的资源权限) * 2.可采用内存存储方式,也可能采用数据库方式等 * @param auth * @throws Exception */ @Override protected void configure(AuthenticationManagerBuilder auth) throws Exception{
//super.configure(auth);// auth.inMemoryAuthentication()// .withUser("admin")// .password(passwordEncoder.encode("123456"))// .roles("admin")// .authorities("Role_admin")// .and()// .passwordEncoder(passwordEncoder);//配置BCrypt加密 auth.userDetailsService(customUserDetailsService);
}1.2.3.4.5.6.7.8.9.10.11.12.13.14.15.16.17.18.19.20.21. 测试启动项目,访问http://localhost:8888/login/page。
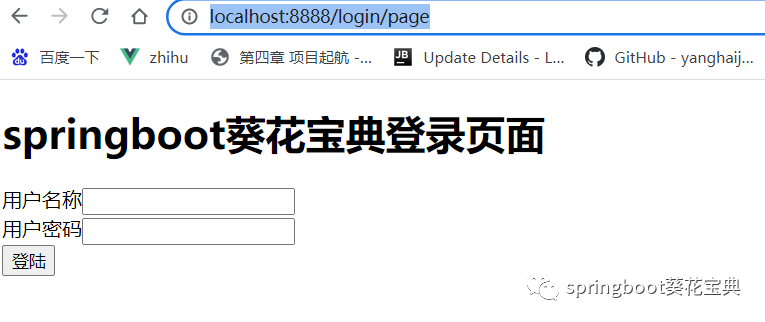
使用账号密码结果为:
账号:admin。
密码:123456。云南idc服务商
